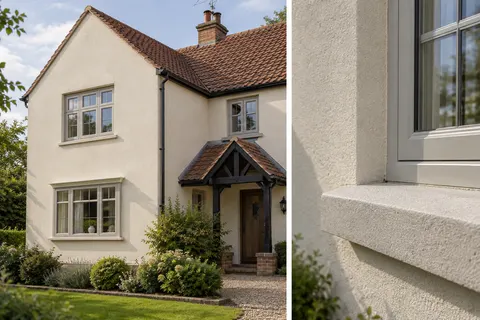
Alderley Edge exterior details
A colour-change brief: what stays unpainted?
The instruction to paint the outside of a house sounds clear until someone reaches the first stone sill. Is the sill included? What about the brick plinth, the timber beneath the eaves or the strip behind the downpipe? A colour-change brief works better when it describes both the new coating and the materials that will remain untouched. This article develops that brief for an Alderley Edge exterior, from the first photographs to the final inspection, without assuming that one colour should spread across every feature.

On this page
Walk around the building with the exclusions in mind
Begin by looking for the materials that make the facade more than a flat wall. Note projecting stone, contrasting brick, timber trim, metalwork and decorative bands. Some may look similar from a distance but need different preparation or protection. The purpose of this first walk is to identify the features, not to decide immediately how they should be treated. A photograph of each elevation is a useful base for the discussion.
Consider small returns as well as the front face. A brick corner may continue around the side, a stone surround may project into the reveal, and a painted band may end under a roof edge. An exclusion shown only on the principal elevation can leave those returns ambiguous. Mark where the material continues and show the intended stopping line from a second angle where necessary.
Distinguish a retained material from an existing coating
An apparently unpainted surface may have a clear treatment or a previous coating that is difficult to identify. Conversely, a dark area might be staining rather than a different finish. The survey should establish what is actually present before specifying cleaning or protection. Avoid assuming that anything outside the render can withstand the same preparation method without consequence.
The proposed render colour change should identify the compatible coating and its background. If adjacent materials need their own treatment, describe that as a separate item. This makes the scope easier to understand and avoids a situation in which the wall has a detailed specification while the timber or stone is covered by a vague instruction to make good around the edges.
Use a simple three-way schedule
It helps to separate surfaces into those being coated, those being prepared for a separate finish and those staying untouched. The distinction is practical. Timber that needs repainting is not the same as timber that needs only protection during render work. Exposed masonry that remains visible should not be included in a preparation allowance intended for a coated wall.
Give each item a location and refer to the photograph or elevation drawing. The schedule does not need elaborate software; it needs to be clear enough for someone who has not taken part in the original conversation. If a feature is still undecided, mark it as undecided rather than allowing two different assumptions to enter competing quotations. Resolve that item before the work reaches it.
| Category | Example | What to state |
|---|---|---|
| Coat | Sound rendered wall | Product, colour and preparation |
| Separate treatment | Previously painted timber | Its own preparation and coating |
| Leave untouched | Exposed stone sill | Protection and the precise stopping edge |
Agree where the visible line will fall
The edge between coated and retained material is part of the design. A line that follows the outer edge of a stone band can look different from one that stops at the masonry joint behind it. Decide which is intended and whether the existing geometry permits a clean, durable detail. The application team should not have to make a permanent aesthetic choice while the coating is being applied.
On an uneven older facade, a perfectly straight visual line may require more intervention than expected. Discuss whether the aim is to follow the existing material honestly or to alter the background to create a new alignment. That choice can affect both appearance and the amount of preparation. It should be explained before a quotation is compared with one that assumes the existing edge will simply remain.
Check what removal and repair will disturb
A colour change may include local repairs before coating. Those repairs can affect the boundary beside an excluded feature, especially where the old render is loose or hard against the neighbouring material. Identify that possibility during the survey. The repair method and the protection of the retained edge need to work together; masking at the final coating stage cannot undo earlier damage.
If the intended project includes whole-house rendering, the same exclusion schedule should carry through removal, base work and finishing. A feature should not be treated as protected during one stage and disposable during another. Where unexpected condition is discovered, agree the revised treatment before it is concealed. Keep a note of the change so the final inspection uses the current scope.


Test colour beside the materials that remain
A sample viewed in isolation gives only part of the answer. Place the proposed colour where it can be seen beside the retained brick, stone, roofing and frames. Different surrounding tones can make the same coating look warmer, cooler or brighter. Texture and the way light falls across the wall also affect the impression, so allow the sample to reach the appropriate condition before assessing it.
Look from the usual approach to the house as well as close to the surface. A small difference that dominates a close-up photograph may be less noticeable from the path, while a strong colour boundary can become more apparent across the full elevation. Record the approved product and colour reference alongside the sample location. A verbal agreement about the pale one leaves too much room for confusion later.
Plan masking and access around the real site
Protection needs to suit the material it touches. Adhesives, coverings and cleaning methods should not damage a retained finish when they are removed. Discuss vulnerable surfaces, including recently decorated timber and fragile masonry edges. If a feature cannot be protected satisfactorily in its current condition, resolve that problem before the main coating operation is scheduled.
Access can also affect the boundary work. A narrow strip behind a pipe or above a canopy may be difficult to prepare and inspect. Decide whether fittings will be removed or worked around, and identify who will reinstate them. Otherwise the final result may contain an uncoated outline when the fitting is later replaced, even though the main wall appeared complete at handover.
Compare quotations against the same marked scope
Send the same schedule and photographs to everyone asked to price the project. Ask each proposal to identify preparation, repairs, coating, protection and any separate treatment of retained features. A quotation that includes repainting timber should not be compared directly with one that protects it and leaves it untouched. The difference is in the work, not necessarily in the value of the offer.
The Alderley Edge rendering overview brings the service routes together, while the cost guide explains the wider quotation structure. Use those routes to clarify whether the job is decoration on sound render, repairs followed by coating, or a more extensive replacement. The boundary schedule remains useful in each case, but it does not replace the assessment needed to select the work itself.
Inspect both sides of the boundary
At completion, review the coated surface and the material that was meant to remain untouched. Check small returns, underside edges and areas behind reinstated fittings. Compare the result with the approved scope and sample, allowing for the relevant drying requirements. A list of precise observations is more useful than an overall judgement that the colour change does not look right.
Keep the final schedule with the product details and photographs. It explains why certain elements were excluded and helps when later maintenance is planned. A future owner or contractor can then distinguish deliberate retained features from unfinished work. That small piece of documentation is especially useful when several materials meet on a facade and the original design decisions would otherwise be forgotten.
Common questions
Should the unpainted features be listed even if they seem obvious?
Yes. An explicit exclusion is easier to price, protect and inspect than an assumption. It is particularly helpful where several trades work on the same elevation or where a feature changes material around a corner.
Can the boundary be changed after the sample is approved?
It can be discussed, but it should be treated as a change to the agreed scope. Consider preparation, appearance, product compatibility and any relevant approvals before work proceeds on the revised basis.
See housing and planning information for Alderley Edge and nearby places, including the source and geography behind each figure.