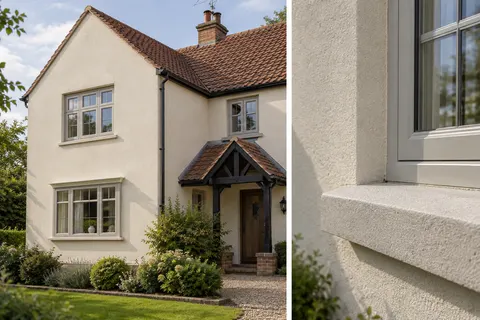
The whole exterior, considered together
House rendering in Alderley Edge | Exterior planning
Whole-house rendering brings several elevations into one project, but it should not turn them into one undifferentiated item on a quotation. The front may have a shallow porch roof; the rear may sit above an extension; one side may have retained brickwork. A useful Alderley Edge house-rendering brief explains those differences before choosing a uniform finish. It also leaves room for the parts of the building that should remain visible and for construction that needs a different treatment.

On this page
An elevation schedule makes the scope clear
Give each face a simple label and describe where the work starts and ends. Include returns into openings, chimney projections, gables and the small areas behind downpipes. A front photograph alone can conceal a considerable amount of work. The schedule should distinguish full removal, retained sound render, new masonry and areas excluded from the project. These are different preparation tasks even when the final colour will be shared.
Draw the stopping line where the new finish meets brick or stone. A line described only as approximately below the window can leave an important visual decision to be made on site. Agree whether corners, plinths and projecting bands are being retained, repaired or altered. A marked photograph can establish the intention; a junction drawing is more useful where thickness or weathering is involved.
| Part of the brief | What to show |
|---|---|
| Wall face | Extent of removal and retained material |
| Openings | Reveals, frames and sill projection |
| Features | Brick, timber and stone remaining exposed |
| Adjacent work | Roofline, glazing, services and insulation |
- Scaffold and protection Windows, doors, paths and planting are covered; downpipes, lights and satellite brackets come off.
- Old finish tested or removed Failed render is removed; the survey decides whether any sound areas can remain within the specified system.
- Masonry repairs and beads Cracked bricks and open joints are repaired; corner, stop and base beads are fixed.
- Base coats Sand-and-cement scratch and float coats, or a manufacturer basecoat with mesh.
- Finish coat A painted, scraped or thin-coat coloured finish, applied in suitable weather.
- Fittings and junctions Fittings are refixed through the new surface; sills, roofline and abutments are sealed.
The usual order of work. The survey and the chosen products decide the actual steps.
Inspect the wall rather than relying on its appearance
An attractive existing surface can hide a weak bond, and an untidy patch can still be firmly attached. The survey should describe how the background was assessed and where further investigation is needed. Openings may reveal layers from previous refurbishments. If old paint or render remains beneath the new system, the specification needs to explain why it is a suitable support and what preparation makes it acceptable.
Do not assume that the oldest-looking elevation and the newest extension have the same wall construction. Changes in masonry, mortar, movement or insulation can alter the proposed build-up. The wall rendering page is useful where one elevation needs a separate treatment. A whole-house contract can still contain more than one carefully defined wall specification.
Retained timber and masonry need their own edges
Timber trim should not be buried simply because a thick coat would make the surrounding surface easier to level. The trim may need independent maintenance, and the junction has to allow the materials to behave as intended. Stone and brick features can also be damaged by careless cutting, cleaning or removal. State the protection and the final separation detail before those surfaces are exposed to work.
If the intention is to leave particular features unpainted, make them part of the finish schedule. A door surround, capping stone and base course may require different preparation and cleaning from the adjacent render. The article on what stays unpainted provides a way to make that distinction visible to everyone pricing the work.
Compare complete systems on the same brief
A comparison between silicone rendering and monocouche rendering should use the same elevations and preparation assumptions. One proposal may include removal and a new base layer while another assumes a sound existing background. Their totals cannot be sensibly compared until that difference is apparent. Identify the manufacturer, named components, reinforcement requirements and final texture rather than relying on a broad family name.
A traditional section of masonry may call for a separate lime-render assessment. That does not mean every older house automatically needs lime, or that a single material is suitable throughout. It means the specification follows the construction encountered. Where insulation is proposed, assess the complete insulated build-up and its junctions rather than adding a generic insulation line to a decorative-render quote.


Resolve windows and roof edges before application
Sill projection matters because the water should leave the finished wall as intended. Deepening a reveal or adding thickness beneath an existing sill can change that relationship. Replacement windows should therefore be discussed alongside the render design, including the final frame position, sealant junction and access for future maintenance. Keep drainage and ventilation openings clear in the agreed detail.
At the roof, establish whether eaves and verges already provide a suitable overhang or need alteration. A contractor should not have to improvise a permanent weathering detail around an unexpectedly thick wall build-up. Allocate any roofline changes and service adjustments to the responsible trades. External wall insulation makes this coordination particularly important, but ordinary re-rendering can also expose short or damaged edges.
Organise a house that remains occupied
Explain the usual routes through the garden, the door that must remain available and any areas where people need privacy. Delivery space, waste storage and scaffold access all compete for room on an occupied plot. Their arrangement should be planned around the site, rather than assuming a driveway can hold every part of the operation at once. The household needs to know when access will change.
Agree protection for glazing, paving, planting and nearby finishes, including how it will be secured and removed. Protection should not obstruct a necessary vent or allow dirty water to collect against a vulnerable edge. Before work starts, photograph the condition of surfaces that will remain. This is a straightforward way to separate pre-existing marks from damage that needs to be put right.
Use a sample as a reference, not a promise of perfection
The sample should show the specified grain, colour and relevant edge treatment on a suitable background. View it alongside the retained brick, roofing and frames. Large areas can appear different from a tiny colour chip, and texture can look much stronger in low sunlight. Agree the sample before ordering the main finish, with enough time for a change if the combination is disappointing.
A whole-house finish still contains practical breaks between elevations. Record how those breaks will be handled and whether batches need coordinating. Where a repaired area meets retained textured material, a seamless match cannot simply be assumed. The patch-and-elevation article explains the choice between accepting a local transition and refinishing a larger, clearly bounded face.
Keep the completion paperwork useful
A handover pack should identify the products used, colour reference, supplier guidance and any ongoing maintenance instructions supplied for that system. Photographs taken before critical areas were covered can help with later alterations. Include information about concealed fixings or insulation where relevant so that a future installer does not treat the finished wall as an ordinary bare masonry surface.
Walk the exterior against the agreed scope, including the small returns and reinstated fittings. Separate unfinished work from a possible defect and give each item a location. The cost guide explains why those responsibilities should already be evident in the quotation. Clear completion criteria make the final review easier than a general instruction to leave everything looking new.
Common questions
Can different elevations use different products?
Yes, where the construction and specification justify it. The quotation should name each build-up and explain the junctions. A shared colour can help the appearance, but it does not remove the need to choose suitable materials for each background.
Should the whole house be stripped?
That depends on the existing covering, its attachment and the replacement system. Full removal should have a reason. Retention also needs evidence that the existing material can support the proposed work; neither approach should be selected from photographs alone.
See housing and planning information for Alderley Edge and nearby places, including the source and geography behind each figure.